

Smash LEARNING BLOCKS TO FAST Track your first HOME
Turn complex home-buying steps into simple, bite-sized lessons and stack Aera credits as you go! Each block helps you build knowledge and confidence to stay on track and get your first home faster.


: Lives on a 2 GHz processor with 2 GB of RAM and Linux.
This transformation replaces the dated, sluggish interface with a sleek, responsive design. It also stabilizes Bluetooth connectivity and prepares your hardware for modern navigation features. Understanding the Risks and Technical Boundaries Hardware Differences Matter
introduced in late 2018, which has a more powerful processor and a capacitive (more sensitive) touchscreen. The Only Way
Upgrading your Medianav 913 system to 10131 can enhance your driving experience with improved navigation features, a more intuitive interface, and better performance. By following the step-by-step instructions outlined in this article, you can successfully upgrade your system and enjoy the benefits of the latest navigation technology. If you encounter any issues during the upgrade process, consult the troubleshooting tips or contact a professional for assistance.
2. Physical OEM Hardware Upgrade (The "True" 10.13.1 Experience) upgrade medianav 913 to 10131
Known as MediaNav Evolution . It runs on the Windows CE 6 operating system. Version 9.1.3 is generally considered the final official stable release for this specific hardware.
on your PC to ensure you have the latest available maps and minor patches officially supported for your specific hardware. Third-Party Customware: Options like
If the installation fails, or the update progress bar doesn't appear at all:
is firmware for the MediaNav Evolution Late 2018 (MN3) , which runs on a Linux operating system and supports Android Auto and Apple CarPlay. : Lives on a 2 GHz processor with 2 GB of RAM and Linux
Yes, it is possible. The enthusiast community has created various custom firmware versions, known as "mods," which can unlock additional features and customizations. However, installing them comes with a higher risk of bricking your system.
The screen will reboot. And reboot again. And again .
Trying to force Linux-based 1.0.13.1 firmware onto a Windows CE-based MN2 unit will instantly , leaving you with a blank screen or a perpetual boot loop. Phase 1: Sourcing the Right Upgraded Hardware
Copy the file named upgrade.lgu directly to the root directory of the USB drive. Do not put it inside any folders. Step 3: Flash the MediaNav System Go to your vehicle and start the engine. Turn on the MediaNav system completely. Insert the prepared USB drive into the MediaNav USB slot. If you encounter any issues during the upgrade
Plug the USB into your car's MediaNav unit. Go to Navigation > Options > Map Update > Update to write your system configuration data to the drive.
The physical dimensions and connectors are generally the same.
Our story ends with a choice. To get the features of version 10.13.1, the protagonist learned they must undergo a . They would need to:
Smash LEARNING BLOCKS TO FAST Track your first HOME
Turn complex home-buying steps into simple, bite-sized lessons and stack Aera credits as you go! Each block helps you build knowledge and confidence to stay on track and get your first home faster.
Unlock Aera Credits
Unlock up to $10k Aera Credits through the Aera App. You can easily keep track on your progress and also see what’s next to unlock!


Personalised Game Plan
A game plan tailored to you, wherever you’re at in the home buying process.

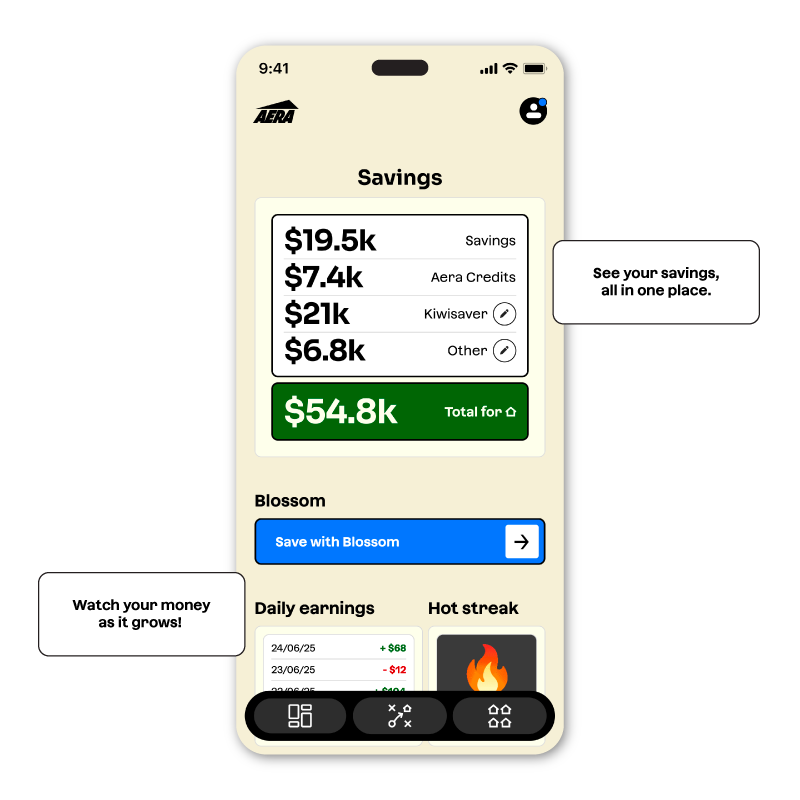
Save faster. Track it all in one place.
See your Aera Credits, KiwiSaver, savings, and Blossom account combined in one dashboard. Get an instant view of how close you actually are to your first home.

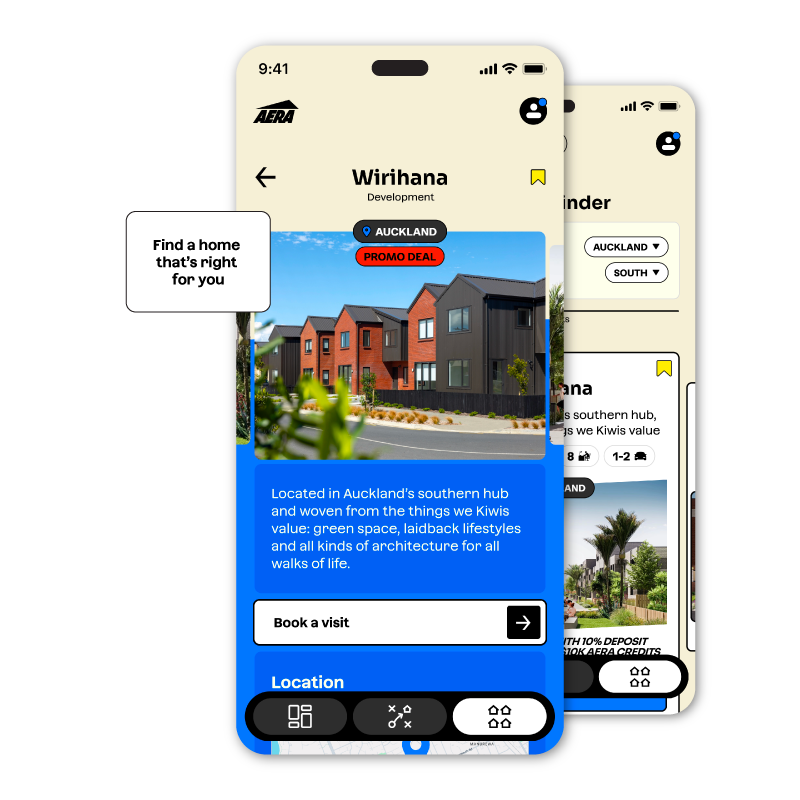
Find your first home
The Home Finder section of the app is being packed with homes right up your alley. Aera helps you sort through what you want vs what you need, and our First Home Finder team goes and finds it for you. Book a call to get started.


Download
Get the Aera app to start unlocking $10k now.